
Smart Hospital Biometric Attendance App
Biometric attendance automation for your Smart Hospital.
By

Ver. 1.0.0
Website: smart-hospital.in
Full Documentation: https://smart-hospital.in/articles
We would like to thank you for purchasing Smart Hospital Biometric Attendance App! We are very pleased you have chosen Smart Hospital for your institution, you will not be disappointed! Before you get started, please be sure to always check out these documentation files. We outline all kinds of good information, and provide you with all the details you need to use Smart Hospital Biometric Attendance App.
This version of Smart Hospital Biometric Attendance App is a completely new build based on Node.js, delivered as a single .exe file. There is no need to install Node.js, or any other software on the client computer — just double-click the EXE and the application opens automatically in your browser.
If you are unable to find your answer here in our documentation then visit our support article site smart-hospital.in/articles. If you are still unable to find it anywhere, then please go our Support section and open a new Support Ticket with all the details we need. Please be sure to include your site URL as well. Thank you, we hope you enjoy using Smart Hospital Biometric Attendance App!
Help & SupportSystem Requirements
Smart Hospital Biometric Attendance App should be installed on a PC or computer which is on the same network where your biometric attendance devices are connected through a router. Using Smart Hospital Biometric Attendance App, you must have a running latest Smart Hospital (version 7.0 or above) on your online server with a domain, subdomain, or IP address. Smart Hospital Biometric Attendance App sends attendance data to your online Smart Hospital, so before using Smart Hospital Biometric Attendance App you must configure your Smart Hospital for the biometric devices you will use.
No additional software installation is required. Smart Hospital Biometric Attendance App is delivered as a self-contained .exe file — Node.js is bundled inside it.
To use Smart Hospital Biometric Attendance App, your computer hardware/software should comply with the following —
- At least Intel i3 processor or its equivalent
- At least 4 GB of RAM
- Windows 10 or Windows 11 — 64-bit Operating System
- Broadband Internet connectivity with minimum 1 MBPS speed
- A modern web browser (Chrome, Edge, Firefox) — for the dashboard
- The PC must remain powered ON during working hours for real-time attendance capture
Smart Hospital Biometric Attendance App Installation & Configuration
Smart Hospital Biometric Attendance App can be installed and configured in the following 5 steps —
Step 1 — Biometric Device Configuration
Smart Hospital Biometric Attendance App supports any biometric attendance device which supports ZKTeco Firmware with Push Data (at least Push Service Ver. 2) feature. In this documentation we have used the ZKTeco K60 model device.
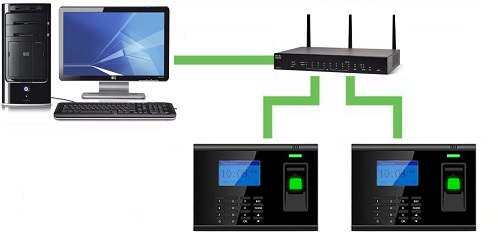
In your network, biometric devices and the computer where you will run Smart Hospital Biometric Attendance App should be connected to your network Router via LAN cable or Wi-Fi. The computer where you run Smart Hospital Biometric Attendance App must have internet access, otherwise it will not be able to send attendance data to your Smart Hospital even if Smart Hospital is hosted on your local LAN network.
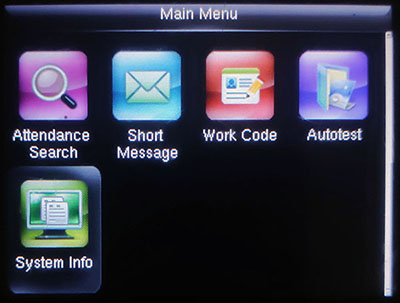
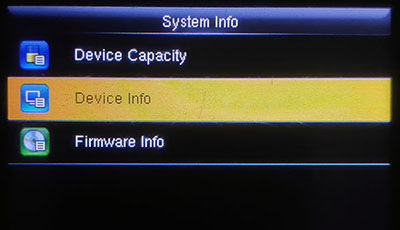
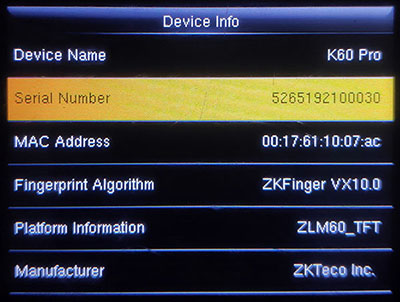
At the Main Menu screen, first go to device System Info to check the device Serial Number. This Serial Number will be required in Step 3 and Step 5.
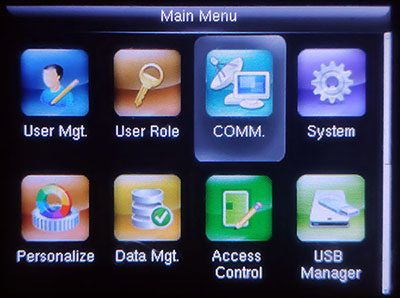
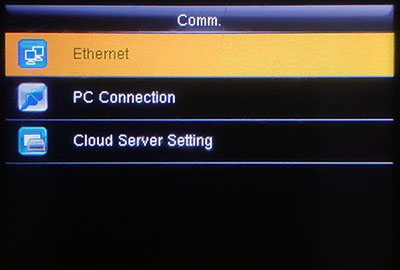
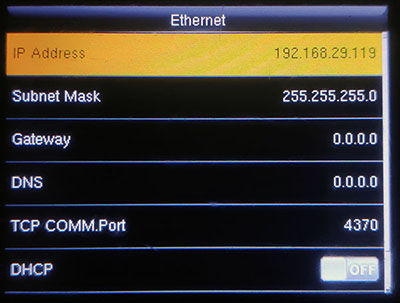
In Subnet Mask enter 255.255.255.0
In Gateway enter your router IP (e.g. 192.168.1.1) or 0.0.0.0
In DNS enter 0.0.0.0
In TCP Comm. Port or Port, leave it at the device default or enter 4370
Keep DHCP OFF
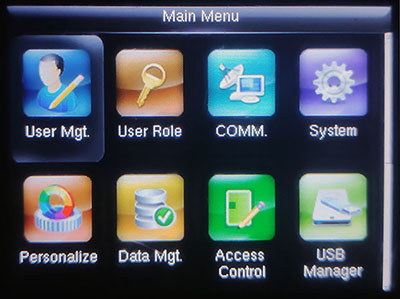
At the Main Menu screen go to User Mgt. (User Management)
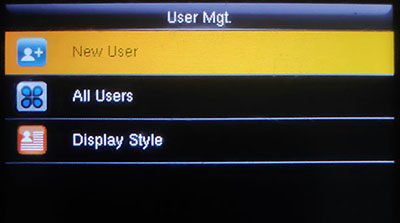
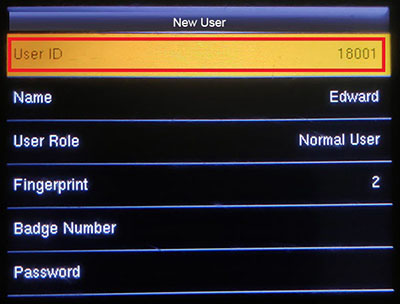
Fill in the remaining fields (Name, etc.) appropriately. Add all staff users in the same way.
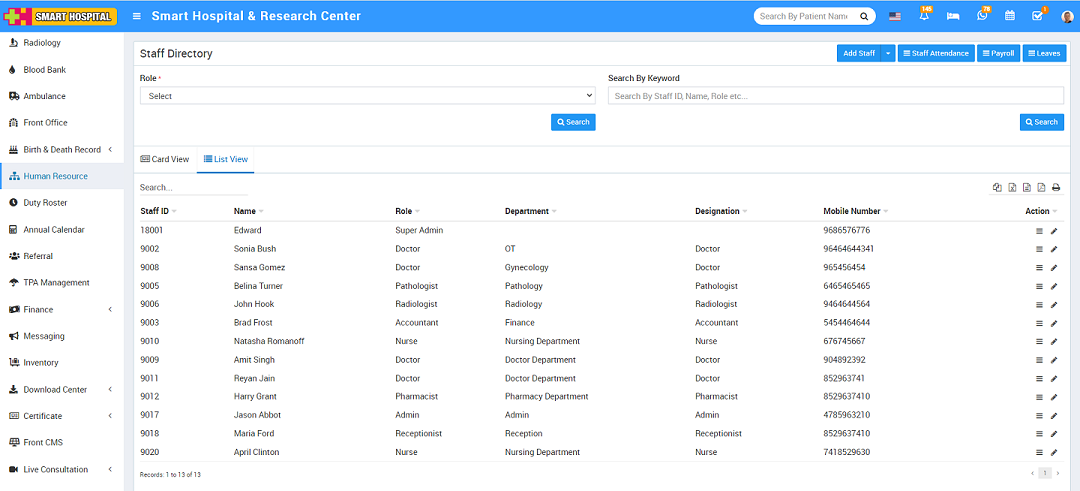
Step 2 — Latest Smart Hospital (version 7.0) up and running
Your Smart Hospital should be up and running and must be registered with your Envato Market Purchase Code. There should be staff records present for attendance to work. If you have not yet installed Smart Hospital, check the Smart Hospital documentation in the Smart Hospital downloaded package. In this documentation we assume Smart Hospital is installed at base URL https://demo.smart-hospital.in/
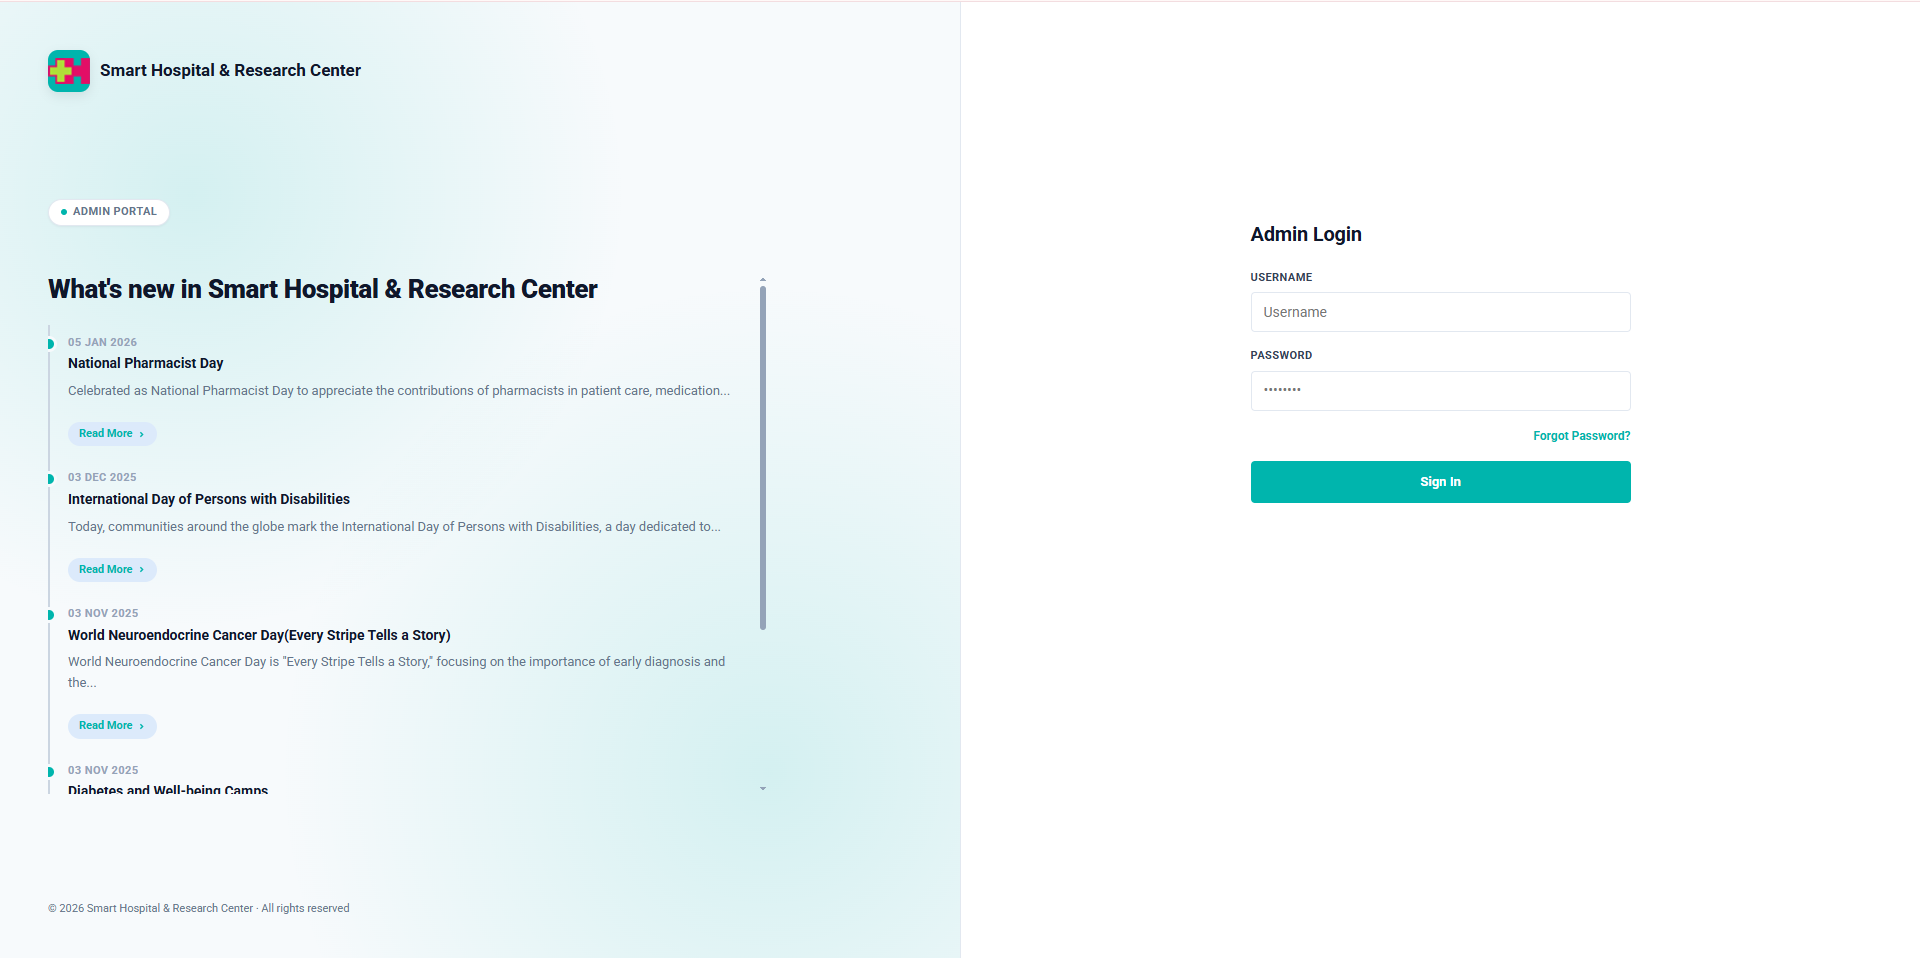
Sign in to Smart Hospital as an administrator at https://demo.smart-hospital.in/site/login — replace the host with your own hospital's address. This is the same address you enter as the Site URL in Step 5 and the address the licence is bound to, so use the exact one your hospital runs on. If the site is served from a sub-folder, include it (for example https://devx.webfeb.com/sh50demo/) — the licence is registered against the full host and path.
Step 3 — Smart Hospital configuration for your biometric devices
Login to your Smart Hospital as superadmin and go to System Settings > General Setting. Go to the Attendance Type setting. Set Biometric Attendance to Enable. In the Devices input box, enter your biometric device Serial Number (noted in Step 1). If you are using multiple devices, enter their Serial Numbers separated by a comma (,). Finally click Save.
Step 4 — Running Smart Hospital Biometric Attendance App
Smart Hospital Biometric Attendance App is delivered as a single self-contained .exe file. No installation of Node.js, or any other software is required.
In your Smart Hospital Biometric Attendance App package, locate the file:
SmartHospitalBiometric-win-x64.exe
Double-click SmartHospitalBiometric-win-x64.exe to start the application.
If Windows shows a security prompt ("Windows protected your PC"), click More info and then Run anyway.
The application will start and automatically open your default browser at:
http://localhost:3001
If the browser does not open automatically, open it yourself and type the above address in the address bar. 3001 is the default — it is the webPort value in config.json, and you can change it there and restart the application.
The console window confirms the address it is actually serving on:
[2026-09-01 09:15:22] [INFO] Web dashboard: http://localhost:3001 (bound to 127.0.0.1)
Note: If port 3001 is already in use on your PC by another application, Smart Hospital Biometric Attendance App asks Windows for a spare port instead. The replacement port is not predictable — it is not simply 3002 — so you must read the exact URL from the console window, where the same line then looks like this:
[2026-09-01 09:15:22] [INFO] Web dashboard: http://localhost:51423 (port 3001 was busy, bound to 127.0.0.1)
Open that URL in your browser instead. To avoid the guesswork on a PC where 3001 is taken, set a fixed free port as webPort in config.json and restart.
The dashboard is bound to 127.0.0.1, so it can be opened only from this PC. That is deliberate — it keeps the dashboard off the rest of the network.
Important: The application window (black console window) must remain open while taking attendance. Do not close it. To stop the application, close that window or press Ctrl + C inside it.
To make it easy to start the application every day, right-click on SmartHospitalBiometric-win-x64.exe, select Send to > Desktop (create shortcut). You can then start the application directly from your desktop.
Keeping it running: the application captures punches only while that console window is open. Closing the window, signing out of Windows, or restarting the PC stops capture. Punches are still held on the biometric device itself, but they will not reach Smart Hospital until someone starts the application again.
On a dedicated attendance PC, set it to start by itself. Pick one of these two methods:
- Startup folder — press Win + R, type
shell:startupand press Enter, then copy a shortcut toSmartHospitalBiometric-win-x64.exeinto the folder that opens. The application will start every time this Windows user signs in. - Task Scheduler — create a new task, set it to run
SmartHospitalBiometric-win-x64.exeAt log on, and tick Restart if the task fails. This also brings the application back if it ever stops unexpectedly.
Also turn off sleep and hibernation in the Windows power settings, and enable automatic Windows sign-in, so the PC comes back on its own after a power cut or an update restart. A hospital PC that is expected to record attendance around the clock makes this more important, not less.
Note: installing the application as a Windows service is not part of this standalone build. Use one of the two methods above.
Step 5 — First-time Login and Device Configuration in Dashboard
When the application opens in your browser for the first time, you will see the Login page.
Default Login Credentials:
- Email: admin@gmail.com
- Password: password
Important: Change your password immediately after the first login from Settings > Account.
Recovery Key — Save it!
On the very first run, the application prints a Master Recovery Key in the console window. This key is shown only once. Save it in a safe place — you will need it if you ever forget your password.
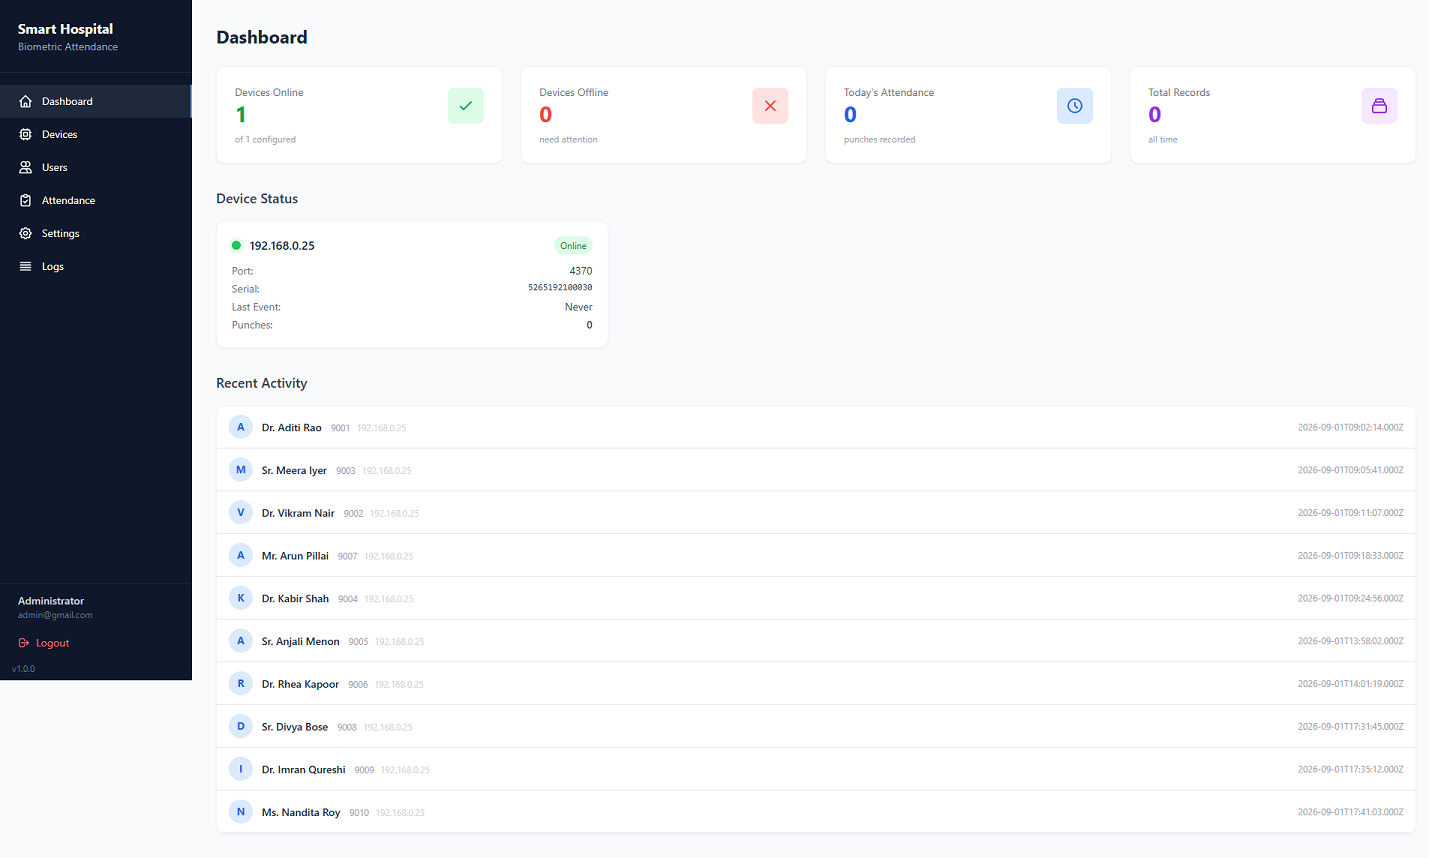
After logging in — and once your installation has been licensed, which your support contact will walk you through — you will see the Dashboard, a real-time overview of your devices and attendance activity.
Go to the Devices page and click + Add Device. Enter the following details for each biometric device:
- IP Address — the static IP you set in Step 1 (e.g. 192.168.1.25)
- Port — 4370 (default ZKTeco port)
- Serial Number — the serial number noted in Step 1
- Site URL — your Smart Hospital URL (e.g. https://demo.smart-hospital.in/)
Click Save. If the device IP and network are correctly configured, the device status should change to Online (green indicator) within a few seconds.
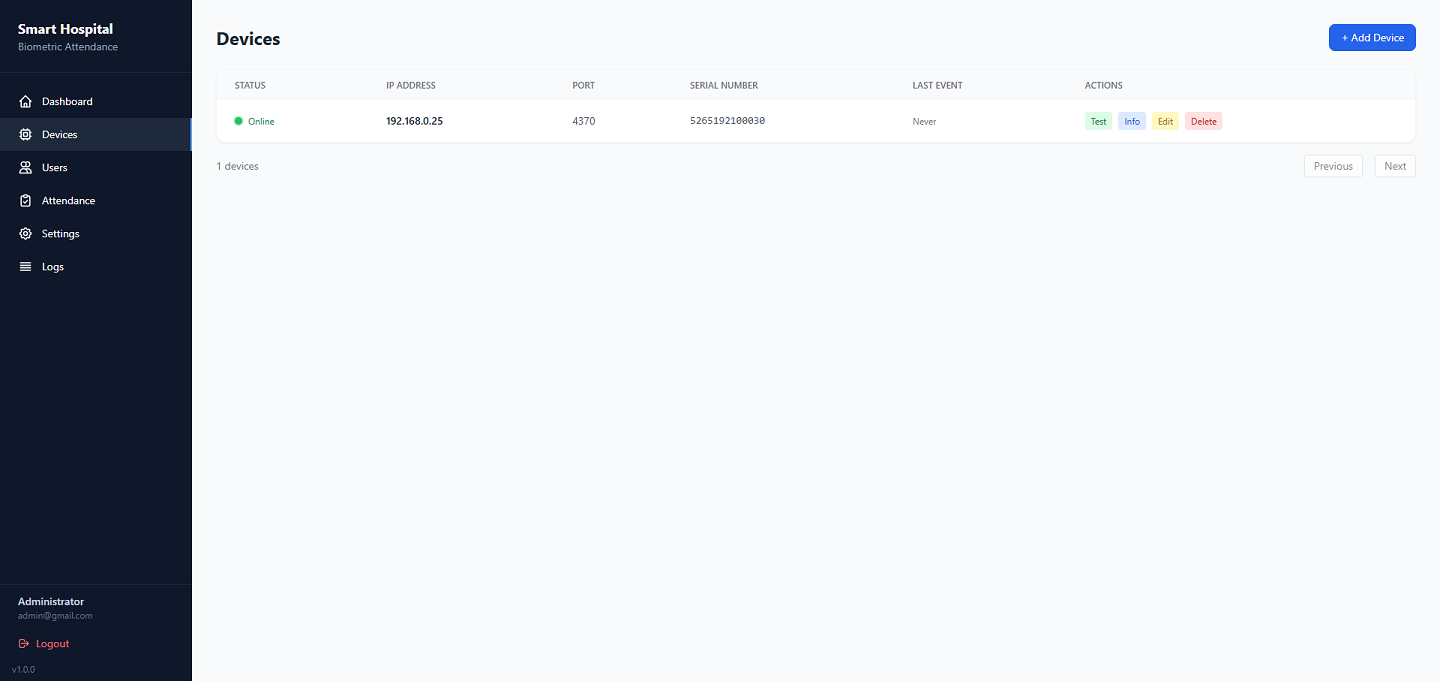
You can add multiple devices by clicking + Add Device again for each device.
Once devices are online, Smart Hospital Biometric Attendance App will automatically capture attendance in real time. When a staff member punches their finger on the biometric device, the attendance is recorded locally and immediately sent to your Smart Hospital.
Offline / Retry Sync: If the internet is temporarily unavailable, attendance records are saved locally in the application database. They are automatically retried and synced to Smart Hospital when the connection is restored. You can also manually trigger a retry from the Dashboard using the Retry Sync button.
Every staff member whose attendance has been submitted through Smart Hospital Biometric Attendance App will be directly marked as Present in Smart Hospital. After the attendance session, go to your Smart Hospital Admin Panel > Human Resource > Staff Attendance, select the Attendance Date, then click Search. Staff who punched in through the biometric device will appear as Present with their punch time. Click Save to submit the remaining staff attendance and send Absent notifications.
For staff attendance, go to Human Resource > Staff Attendance. Staff who punched in will appear as Present. Note that the device User Id must be the staff member's Employee ID -- Smart Hospital matches punches on the staff Employee ID, and a punch enrolled under any other ID is silently ignored.
If you need help for installation and configuration, do not hesitate to open a Support Ticket.
Using the Web Dashboard
The Smart Hospital Biometric Attendance App includes a built-in web dashboard accessible at http://localhost:3001 (or the port shown in the console window) in any modern browser. The dashboard has the following sections:
Dashboard (Home)
The main overview screen shows:
- Devices Online / Offline — live count of connected biometric devices
- Today's Attendance — total punches recorded today
- Total Records — all attendance records in the local database
- Device Status Cards — per-device IP, Serial Number, last event time, and punch count
- Unsynced Records Alert — shows how many records could not be posted to Smart Hospital (with a Retry Sync button)
- Recent Activity — live feed of the latest attendance punches
The dashboard auto-refreshes every 5 seconds.
Devices
Manage your biometric devices here. You can:
- Add Device — enter IP, Port, Serial Number, and Site URL
- Edit — update device details
- Delete — remove a device
- Test — test connection to the device
- Info — view live device information
- View live connection status (Online / Offline) for each device
Users
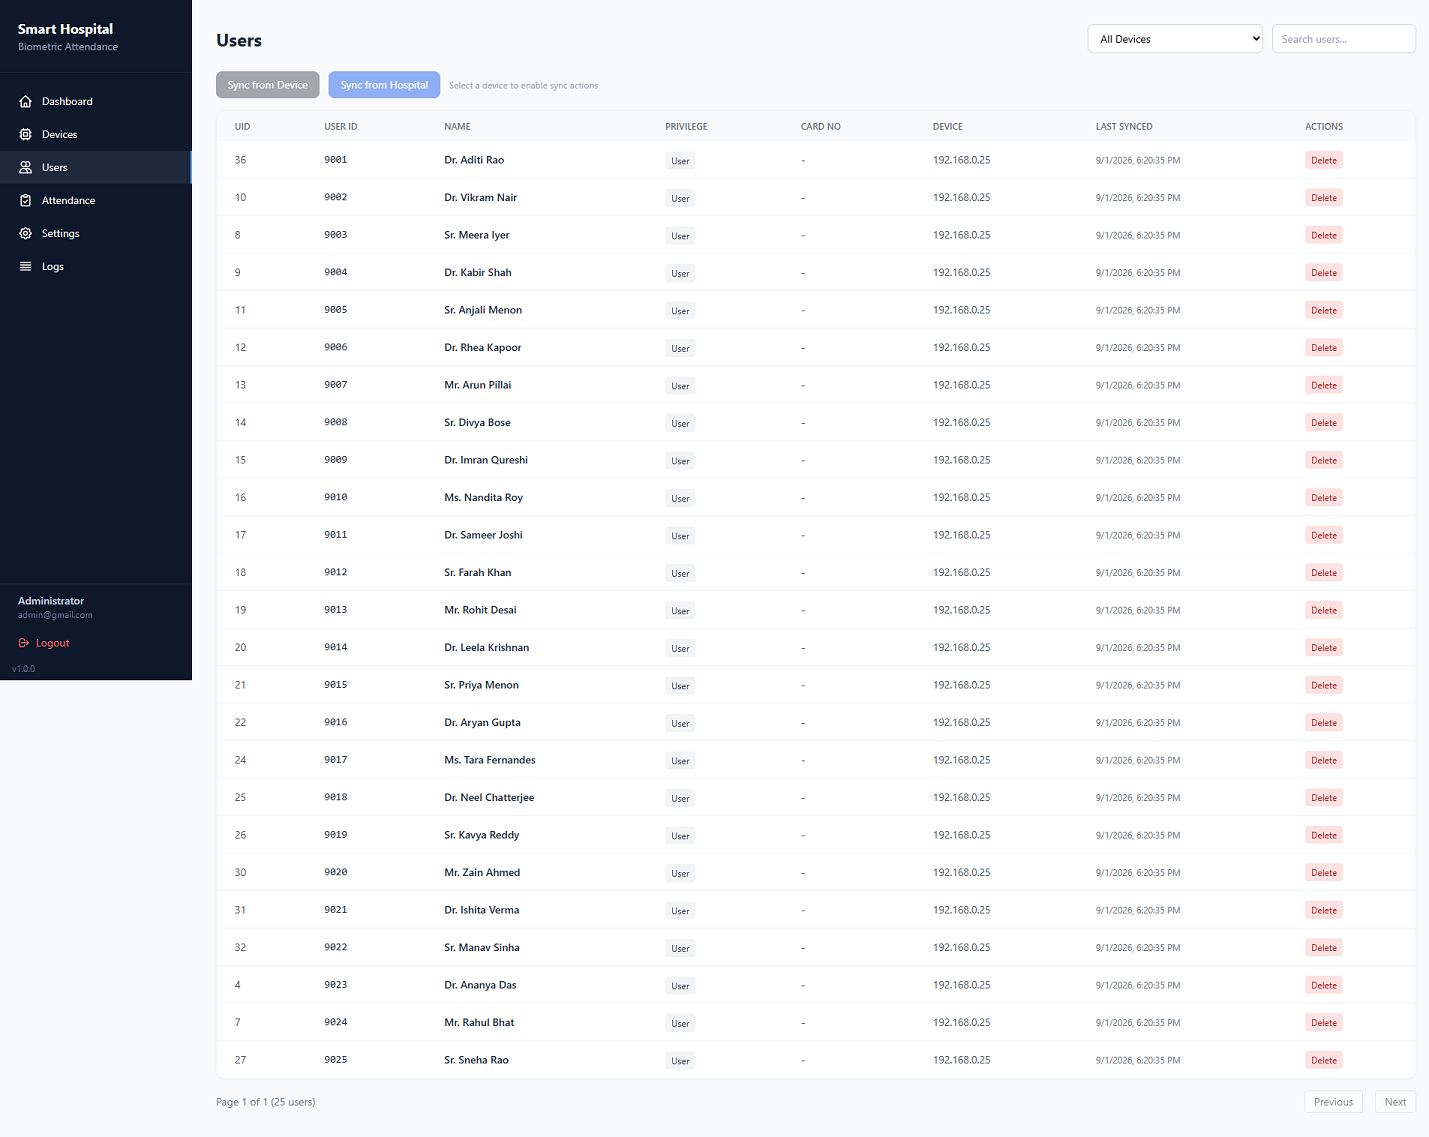
View the staff users held on this application, synced from the biometric device. Use Sync from Device to pull the users registered on the biometric device. There is no Sync from Hospital equivalent: the Smart Hospital site does not expose a biometric users feed, so staff names come from what is enrolled on the device itself and attendance for an unknown ID is shown against the raw Employee ID. This page helps verify that user Employee IDs / Staff IDs match correctly between Smart Hospital and your biometric devices. You can filter by device or search by name.
Attendance Logs
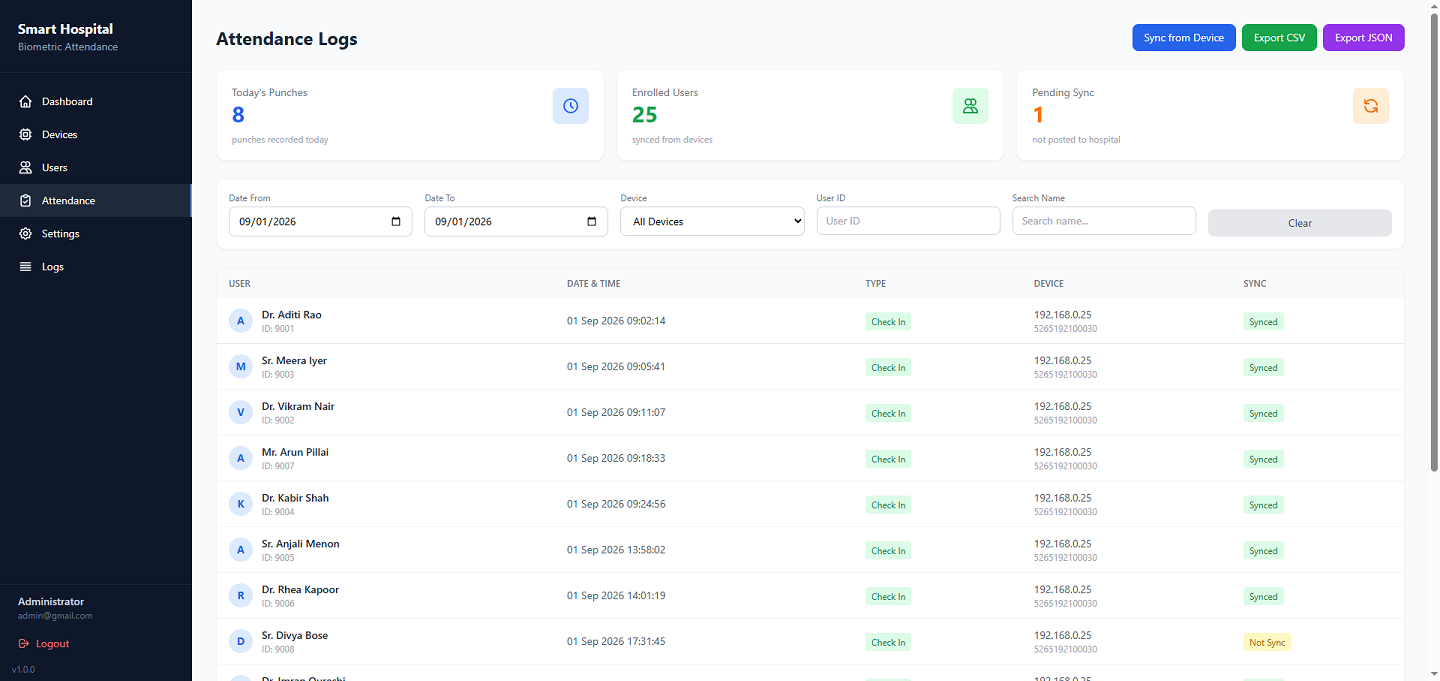
Browse all attendance records captured by the application. Filter by date range, device, User ID, or name. You can also Export CSV or Export JSON for offline use or reporting. Summary stats at the top show Today's Punches, Enrolled Users, and Pending Sync count.
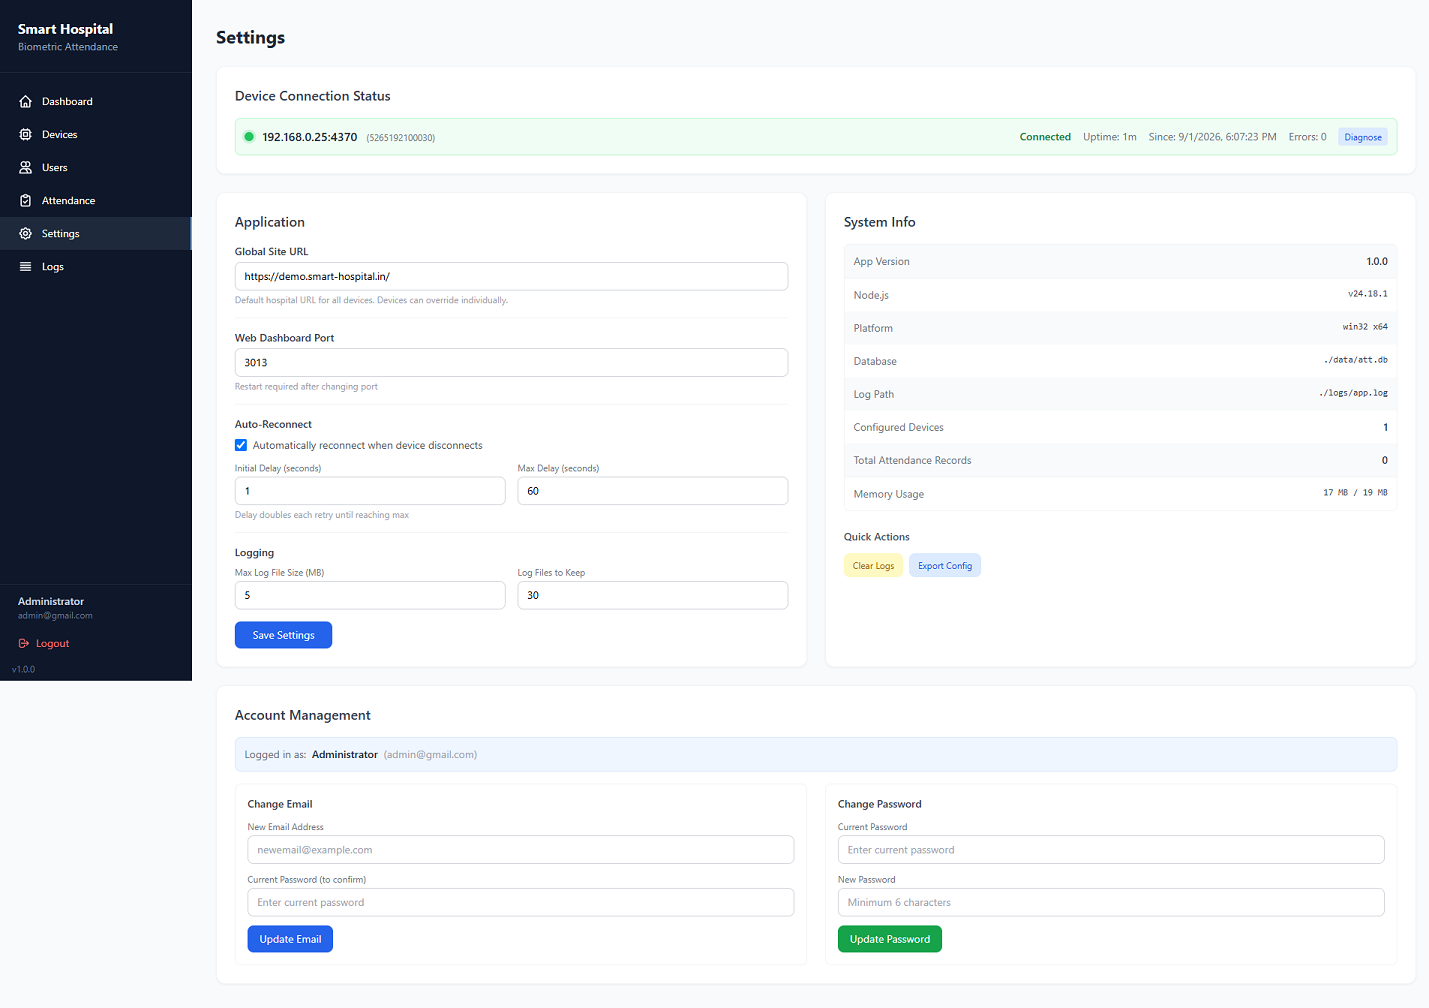
Settings
Configure application-level settings:
- Global Site URL — the default Smart Hospital URL used when a device does not have its own Site URL set
- Web Dashboard Port — change the port the dashboard listens on (restart required)
- Auto-Reconnect — automatically reconnect to devices when connection drops (configurable delay)
- Logging — set max log file size and number of log files to keep
- System Info — view app version, Node.js version, platform, database path, and memory usage
- Quick Actions — Clear Logs, Export Config
- Account (scroll down) — change your login email and password
- Password Reset — reset password using the Master Recovery Key if you are locked out
Logs
View live application logs — device connection events, attendance captures, sync status, and errors. Useful for troubleshooting device connectivity or sync issues.
Common Issues
- Device shows Offline: Check that the device IP address is correct and that the device and PC are on the same network. Ensure DHCP is OFF on the device.
- Dashboard not opening: Try
http://127.0.0.1:3001in your browser (127.0.0.1 and localhost are the same machine). Make sure the application console window is still running, and read itsWeb dashboard: …line for the port it actually opened on. - Attendance not syncing to Smart Hospital: Check the Site URL in device settings, verify the Smart Hospital URL is reachable from this PC, and open the Logs page for the exact reason. Note that Smart Hospital replies with HTTP 200 even when it rejects a punch, so the application reads the reply message: anything that is not an acceptance is kept as pending and retried later, so no punch is lost. The most common rejection is "Attendance setting not configured", which means the site side is not ready yet. Ask your Smart Hospital administrator to: enable Biometric Attendance in the site settings; add this device’s serial number to the biometric device list; configure the staff attendance schedule for each role; and make sure every staff member is enrolled on the device under their Employee ID. Once that is done, press Retry Sync on the Dashboard to push the held punches.
- Forgot Password: Use the Recovery Key saved during first run. Go to the Login page and click Forgot Password, then enter your email and recovery key.
- Port already in use: If port 3001 is busy, the application asks Windows for a spare port instead. The replacement is not predictable, so read the exact address from the
Web dashboard: …line in the console window. To pin a specific port, setwebPortinconfig.jsonand restart the application.
Free Help & Support
All of our items come with free support, and we have a Dedicated Support Ticket System to handle your requests. Support is limited to questions regarding the code features, bugs, or problems with the application. We are not able to provide support for code customizations or third-party plugins. If you need help with anything other than minor customizations of your code then you should enlist the help of a developer or our customization service.
Thank you once again for the purchase!
Once again, thank you for trusting Smart Hospital Biometric Attendance App. We will be glad to help you if you have any questions relating to this application.